เลือกตั้ง 62 - คนรุ่นใหม่ - Data Visualization
- saruka61
- Apr 19, 2019
- 6 min read
Updated: Apr 21, 2019
ในขณะที่พรรคการเมืองต่างๆยังคงวุ่นอยู่กับการจัดตั้งรัฐบาล ในบทความนี้เรามาลองใช้ Data Science แบบง่ายๆ เพื่อหาคำอธิบายปรากฎการณ์บางอย่างจากผลการเลือกต้ังที่เพิ่งผ่านไปหมาดๆ ร่วมกับข้อมูลสาธารณะที่สามารถหาได้จากอินเตอร์เน็ต รวมถึงการทำ Data Visualization แบบสวยๆและน่าจะมีประโยชน์ต่อผู้ที่สนใจ
ปรากฎการณ์ที่ผมพูดถึงในที่นี้ ผมกำลังพูดถึงคำว่า "คนรุ่นใหม่" และ "คนรุ่นเก่า" ซึ่งเป็นคำที่มีการอ้างถึงและหลายๆท่านน่าจะได้ยินหลายๆครั้งในช่วงการหาเสียงในการเลือกตั้งครั้งที่ผ่านมา รวมถึงบทความวิเคราะห์ต่างๆที่เริ่มมีออกมาหลังการเลือกต้ัง
ในหลายบทความมีการพูดถึงบทบาทของ "คนรุ่นใหม่" ที่น่าจะส่งผลกระทบหรือแม้แต่จะเป็นตัวแปรสำคัญต่อผลการเลือกตั้งครั้งที่ผ่านมา หรือแม้แต่การส่งผลต่อยุทธศาสตร์การหาเสียงในการเลือกตั้งครั้งนี้ ที่พรรคการเมืองหลายพรรคตั้งใจเจาะกลุ่มคนรุ่นใหม่ ซึ่งแน่นอนว่าการวิเคราะห์ของบทความต่างๆเหล่านี้มีการตั้งสมมติฐานบางอย่าง ซึ่งในหลายๆครั้งไม่ได้เอ่ยถึงอย่างชัดเจนในการวิเคราะห์ หรือแม้แต่อาจจะเป็นความเชื่อส่วนบุคคลของผู้เขียนบทความเหล่านั้นเอง
ตัวอย่างสมมติฐาน (หรือความเชื่อ) ที่ผมรู้สึก (อาจจะรู้สึกคนเดียว ^ ^!) เวลาอ่านบทความวิเคราะห์ต่างๆ คือ คะแนนเสียงที่พรรคอนาคตใหม่ได้ส่วนใหญ่น่าจะมาจากเสียงของคนรุ่นใหม่ ?!? ซึ่งเป็นเหตุให้ผมอยากลองทดสอบข้อสมมติฐานหรือความเชื่อเหล่านี้ในการเลือกตั้งคร้ังที่ผ่านมา
รายละเอียดขั้นตอนในการเตรียมข้อมูล (เฉพาะขั้นตอนที่สำคัญ)
ในเบื้องต้น ผมใช้ผลการเลือกต้ังแบบ 100% ที่ประกาศบน website ของสำนักงานคณะกรรมการการเลือกต้ัง (กกต.) Download "HERE" ซึ่งอยู่ในรูปแบบของ PDF
จากนั้นทำการ convert เอกสาร PDF ให้เป็น csv หรือ excel format โดยใช้บริการ converter ของ website ต่างๆที่หาได้ง่ายๆบนอินเตอร์เน็ต (ซึ่งแน่นอนว่า มีข้อจำกัดหลายๆอย่างเช่น ลิมิตจำนวนหน้าหรือขนาดไฟล์ในการ convert แต่ละคร้ัง)
ความยากลำบากทีเกิดขึ้นกับข้อมูลที่ convert มาจากไฟล์ PDF โดยเฉพาะข้อมูลที่มีบางส่วนเป็นภาษาไทย ก็คือ ความไม่สมบูรณ์ของชื่อผู้สมัครและชื่อพรรคการเมือง เช่น พลังประชารัฐ จะกลายเป็น "พลงประชารฐ" เป็นต้น ด้วยเหตุนี้ จึงมีความจำเป็นต้องมีการทำ data manipulation เพื่อให้ชื่อต่างๆมีความถูกต้อง โดยชื่อพรรคน้ัน คงไม่มีปัญหาอะไรในการแก้ไขชื่อพรรคแบบ manual เนื่องจากจำนวนพรรคมีไม่มากนัก (อีกเหตุผล ที่มีความจำเป็นจะต้องลงทุนแก้ไขแบบ manual ก็คือ การสร้าง linkage ที่จะใช้เชื่อมข้อมูลกับข้อมูลที่ได้จากการ Scrape นอกเหนือไปจากตัวแปรเขตการเลือกตั้ง เพื่อให้แน่ใจว่า ชื่อของผู้สมัครจะอยู่ในตำแหน่งที่ถูกต้อง หลังจากการ Join) ดังน้ัน ผมจึงทำการรวบรวมรายชื่อพรรคการเมืองทุกพรรคที่ลงเลือกต้ังในครั้งนี้ และจัดทำออกมาเป็น list structure แต่ในส่วนของรายชื่อผู้สมัครน้ัน คงเป็นไปไม่ได้ที่จะแก้ไขชื่อผู้สมัครทุกคนแบบ manual เนื่องจากผู้สมัครท้ังประเทศมีเป็นจำนวนมาก ด้วยเหตุนี้ จึงต้องหาตัวช่วยจากแหล่งข้อมูลอื่น
ในที่นี้ ผมหาข้อมูลชื่อ-นามสกุล และพรรคที่สังกัดของผู้สมัครแต่ละคนในแต่ละเขตการเลือกต้ังของประเทศไทย โดยการ Scrape ข้อมูลจาก website ที่มีการรายงานผลการเลือกต้ังในช่วงการเลือกต้ังที่ผ่านมา ซึ่งในที่นี้ผมเลือก website รายงานผลการเลือกต้ังของช่อง 3 เนื่องจากมีรูปแบบของ URL ที่ค่อนข้างเอื้อต่อการ Scrape ข้อมูล
Guiding R-Script สำหรับ Scrape ข้อมูลจาก website รายงานผลการเลือกตั้งของช่อง 3 มีดังต่อไปนี้
library(rvest); library(httr); library(RCurl); library(RSelenium)
library(readxl); library(data.table); library(dplyr)

rD <- rsDriver(browser = "firefox", iedrver = NULL, verbose = TRUE, check = TRUE, extraCapabilities = fprof)
remDr <- rD$client
remDr$setTimeout(type = "page load", milliseconds = 15000)

TH_election <- data.table()
summary <- data.table()
for (k in c(1:nrow(iso))) {
  #Page of interest
  page <- paste0("http://www.ch3thailand.com/%E0%B9%80%E0%B8%A5%E0%B8%B7%E0%B8%AD%E0%B8%81%E0%B8%95%E0%B8%B1%E0%B9%89%E0%B8%8762?page=provice&id=",iso$iso[k])

  remDr$navigate(page)
  Sys.sleep(15)
  # Path of interest
  form <- remDr$findElements(using = "css", value = "div.table-vote.vote-province")

  # Election zone
  where <- remDr$findElements(using = "xpath", value = "//*/h3/span")

  for (j in c(1:length(form))) {
    df <- form[[j]]$getElementText()
    mix <- gsub("\n", "_", df[[1]])
    vote <- strsplit(mix, split = "_") %>% data.frame(.)
    vote[[1]] <- as.character(vote[[1]])
    result <- vote[-1, ] %>% strsplit(., split = " ")
    area <- where[[j]]$getElementText()

    final <- data.table()
    for (i in c(1:length(result))) {
      pull <- strsplit(result[[i]], split = " ")
      ready <- data.frame("no" = pull[[1]], "name" = paste0(pull[[2]]," ",pull[[3]]," ",pull[[4]]),
                          "party" = pull[[length(pull)-1]], "vote" = pull[[length(pull)]], "area" = area[[1]])
      final <- rbind(final,ready)
      rm(pull,ready)
    }
    TH_election <- rbind(TH_election,final)
    rm(df,mix,vote,result,area,final)
  }
  rm(form)

  cmount <- remDr$findElements(using = "css", value = "section.row.CountingVotes")
  df <- count[[1]]$getElementText()
  mix <- strsplit(df[[1]], split = "\n")
  sum <- data.frame("voter" = mix[[1]][2], "no_vote" = mix[[1]][4], "fail" = mix[[1]][6])
  summary <- rbind(summary,sum)

  rm(page)
}

rm(rD,remDr)
remDr$close()
closeAllConnections()
หมายเหตุ:
"iso$iso[k]" ใน R-script ข้างต้น หมายถึง รหัสสำหรับประเทศไทยตามมาตรฐาน ISO 3166-2e สำหรับจังหวัด k ใน dataframe ชื่อ "iso" ที่ได้เตรียมไว้แล้วล่วงหน้าWikipedia
จากนั้นทำการ Join ข้อมูลกับข้อมูลที่ convert จาก PDF ผลการนับคะแนน 100% ของ กกต. เราก็จะได้ Dataframe ที่สมบูรณ์ของผลการเลือกต้ัง 62
ต่อมา เนื่องจากเราต้องการวิเคราะห์บทบาทของเสียงของ "คนรุ่นใหม่" ซึ่งแน่นอนว่า เราคงไม่สามารถหาข้อมูลที่แท้จริงว่าผู้มาใช้สิทธิ์คนไหนเลือกพรรคใด (ถ้าใครมีข้อมูลหรือรู้ช่องทาง รบกวนช่วยชี้ช่อง ด้วยครับ) ในที่นี้ ผมจึงใช้สัดส่วนจำนวนประชากรคนรุ่นใหม่ต่อประชากรผู้มีสิทธิ์ทัั้งหมดในเขตเลือกต้ัง มาเป็นตัวแปรในการวิเคราะห์แทน ซึ่งข้อมูลดังกล่าว สามารถ Scrape ได้ website ของกรมการปกครอง
Guiding R-Script สำหรับ Scrape ข้อมูลจาก website ของกรมการปกครอง มีดังต่อไปนี้
library(rvest); library(httr); library(RCurl); library(RSelenium)
library(data.table); library(dplyr); library(readxl); library(stringr)

rD <- rsDriver(browser = "firefox", iedrver = NULL, verbose = TRUE, check = TRUE, extraCapabilities = fprof)
remDr <- rD$client
remDr$setTimeout(type = "page load", milliseconds = 30000)

for (y in c(40:61)) { # Two last digits of each Buddhist Era i.e. 2540--2561
  for (p in c(1:nrow(iso))) { # Province's ISO code number
    page <- paste0("http://stat.bora.dopa.go.th/stat/xstat/new/",y,"12/",y,"12cc",iso$iso[p],".txt")
    remDr$navigate(page)
    Sys.sleep(5)
    # Get the whole content
    remDr$getPageSource()
    content <- remDr$findElement(using = "xpath", value = "//pre")
    level1 <- content$getElementText()[[1]]
    result <- strsplit(level1, split = "\n") %>%
      do.call(cbind, .) %>% strsplit(., split = "|", fixed = TRUE) %>%
      do.call(rbind, .) %>% data.table(.)

    # Renaming the columns
    colnames(result)[1] <- "desc"
    colnames(result)[seq(3,205,2)] <- rep(paste0("fmale_",0:101))
    colnames(result)[seq(2,204,2)] <- rep(paste0("male_",0:101))
    colnames(result)[206:220] <- c("male_tdob","fmale_tdob","total_tdob",
                                   "male_xhouse","fmale_xhouse","total_xhouse",
                                   "male_other_nat","fmale_other_nat","total_other_nat",
                                   "male_move","fmale_move","total_move",
                                   "male_tot","fmale_tot","tot_tot")

    # Save the file to assigned directory using province name (result[1,1]) & Buddhist Era
    save(result, file = paste0("/Path/to/your/directory/",result[1,1],"_",paste0(25,y),".rda"))
    rm(content,level1,result)
  }
}

remDr$close()
closeAllConnections()
rm(remDr,rD)
ณ ตอนนี้ เราจะได้ข้อมูลที่เราต้องการพร้อมแล้ว ต่อไป เราจะลองทำ Data visualization กับข้อมูลทั้งสองส่วนที่เราได้เตรียมไว้ในเบื้องต้น เราจะเริ่มด้วยการวิเคราะห์คะแนนเสียงที่แต่ละพรรคได้รับในระดับจังหวัด เพื่อสะดวกต่อการทำ Data visualization (ความเป็นจริง คือ ยังคิดรูปแบบที่ถูกใจเพื่อแสดงผลท้ัง 350 เขต ไม่ได้ ^ ^) และเพื่อให้รูปที่แสดงออกมามีรายละเอียดที่ครบถ้วนพอสมควร ผมจึงเลือกแสดงในเบื้องต้นแค่เพียง 5 พรรคแรกที่ได้คะแนนเสียงรวมสูงที่สุด คือ พลังประชารัฐ อนาคตใหม่ เพื่อไทย ภูมิใจไทย และประชาธิปัตย์ ดังแสดงใน Fig.1
Guiding R-Script สำหรับการทำ Data Visualization ข้อมูลผลการเลือกตั้ง มีดังต่อไปนี้
library(data.table); library(dplyr); library(ggplot2); library(gganimate); library(tweenr)

# Subset dataframe
big5 <- subset(vote_by_prv[,c("prv_crect","party_crect","rank","vote_pct")], party_crect %in% c("พลังประชารัฐ","อนาคตใหม่","เพื่อไทย","ภูมิใจไทย","ประชาธิปัตย์"))

# Define directory of logo
big5$image <- paste0("/Path/To/Your/Directory/logo/",big5$ชื่อพรรค,".jpg")

# Create facet plot
# 1. Open jpeg file
jpeg(paste0('/Path/To/Your/Directory/filename.jpg'), width = 16000, height = 9000, units = 'px', res = 1000)
# 2. Create a plot
ggplot(data = big5, mapping = aes(x = party_crect, y = vote_pct, fill = party_crect)) +
  geom_col(position=position_dodge(), width = 0.75) +
  geom_image(aes(image = big5$image, x = party_crect, y = vote_pct+6), size=0.125, by = "width") +
  facet_wrap(~ prvEN, ncol = 11) +
  theme(legend.position = "none", axis.text.x = element_blank()) +
  scale_fill_manual(values = c("อนาคตใหม่" = "orange", "พลังประชารัฐ" = "darkblue", "เพื่อไทย" = "red", "ภูมิใจไทย" = "pink", "ประชาธิปัตย์" = "lightblue")) +
  scale_y_continuous(name = "% of vote received", expand = c(0, 0), limits = c(0, 80)) +
  xlab("Party")
# 3. Close the file
dev.off()
Fig.1 Facet Plot of Selected 5 Parties across Thailand
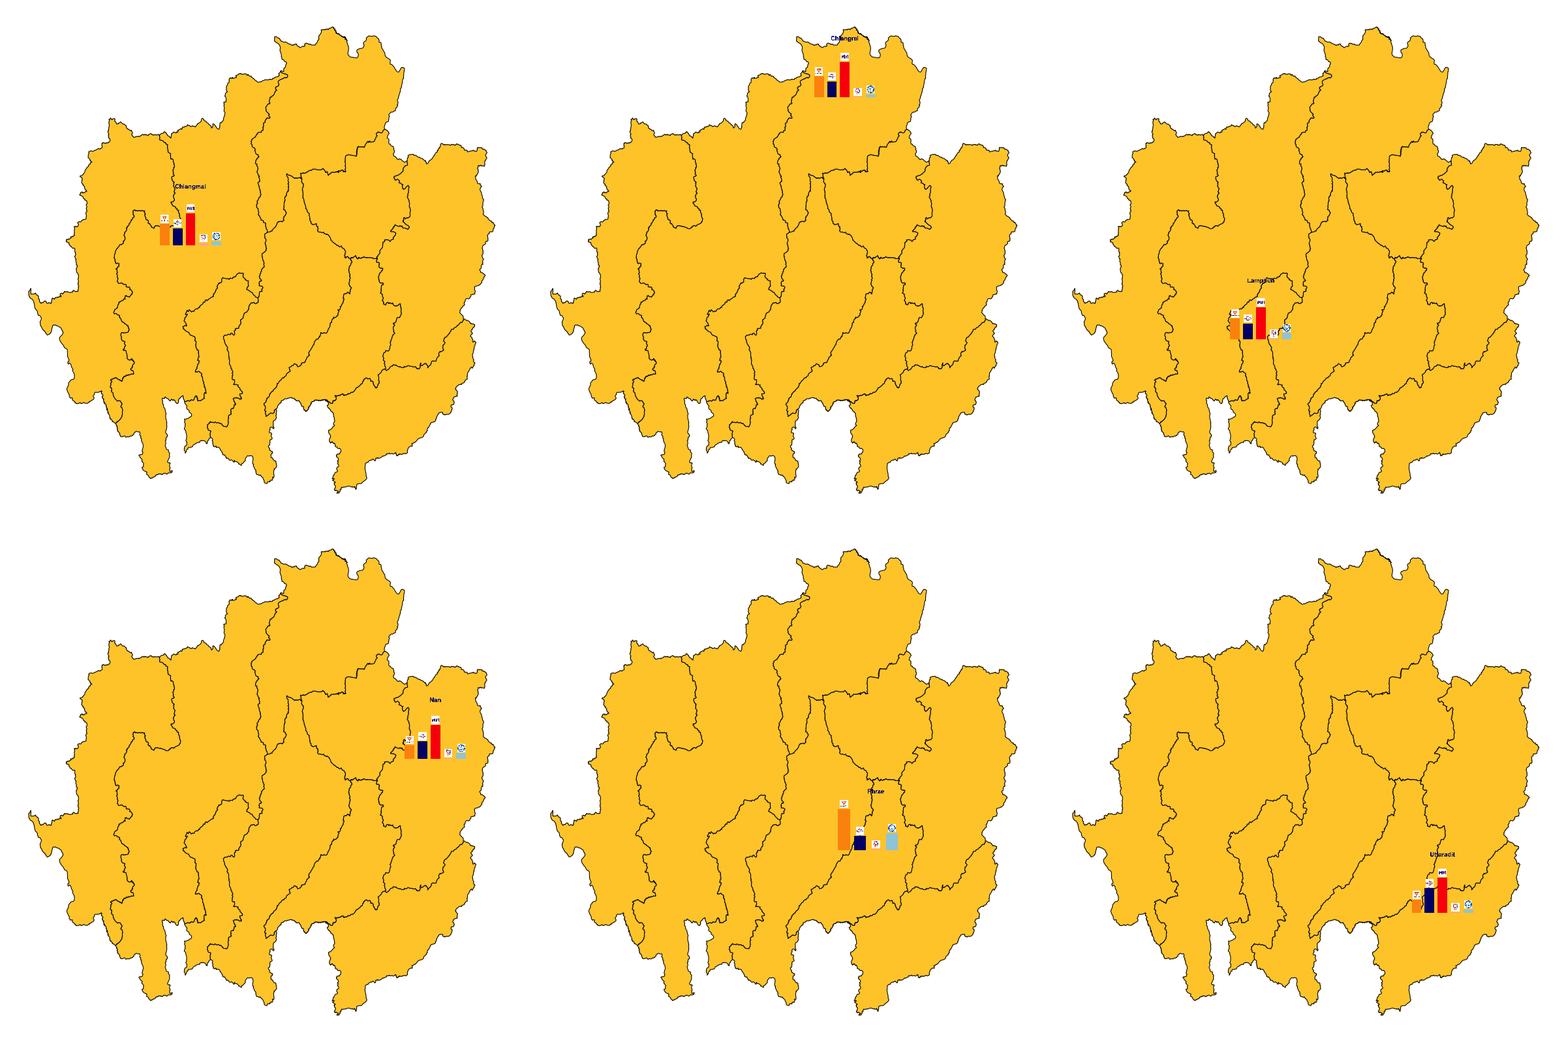
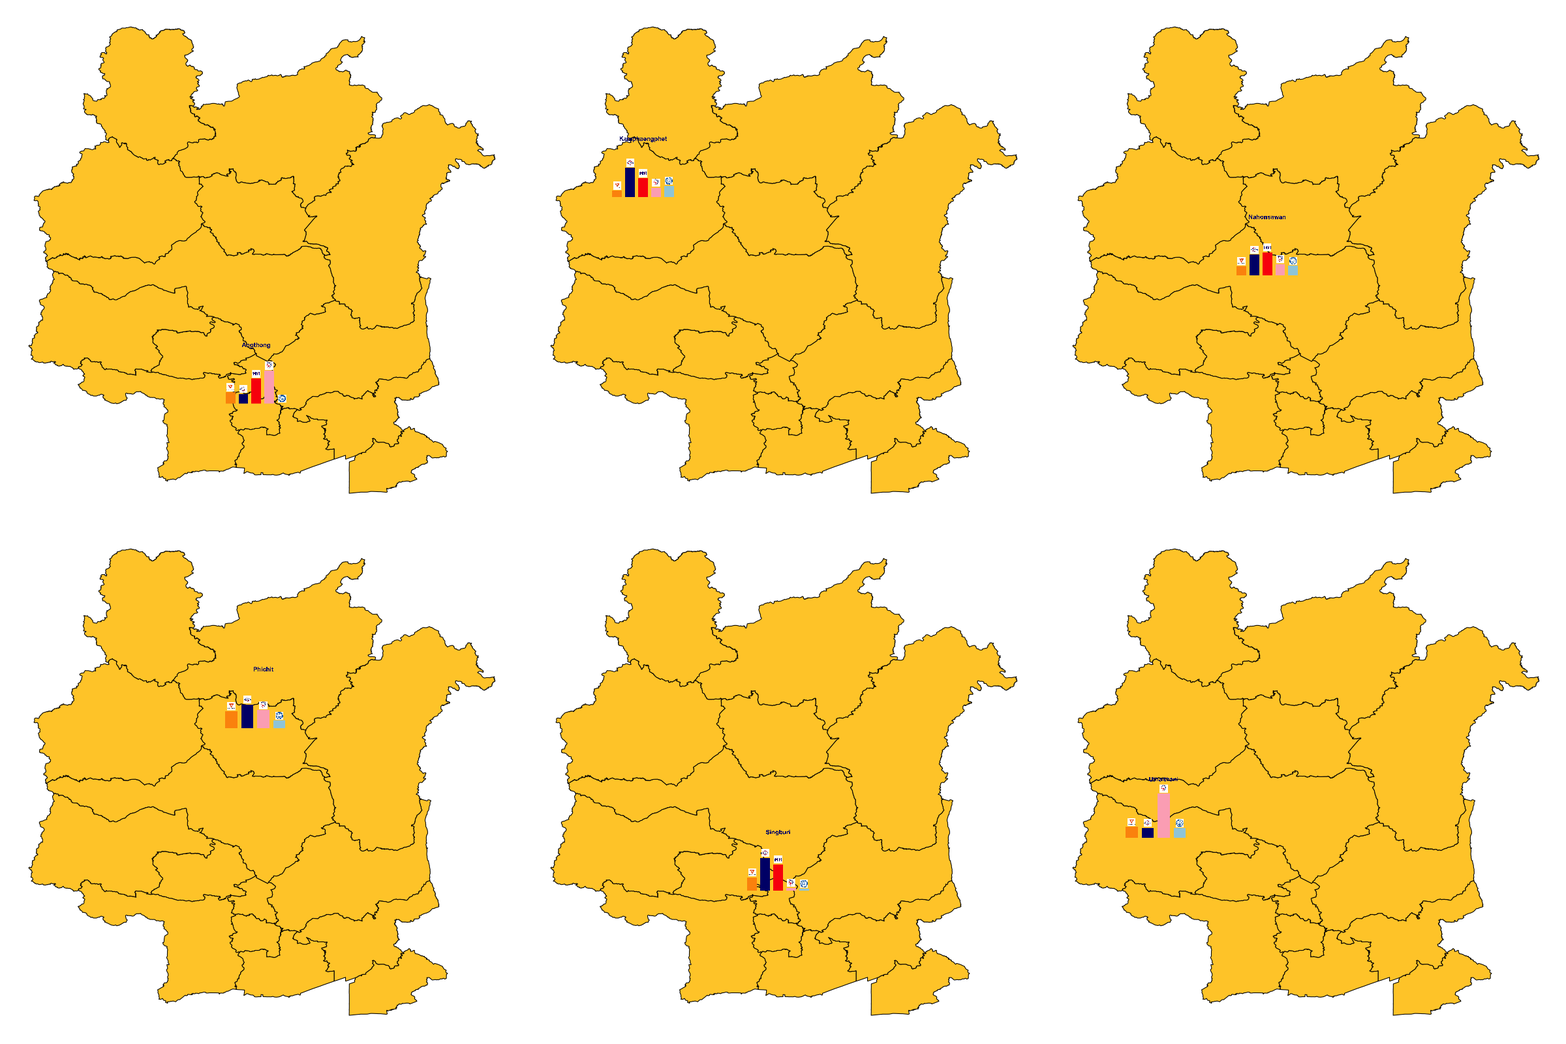
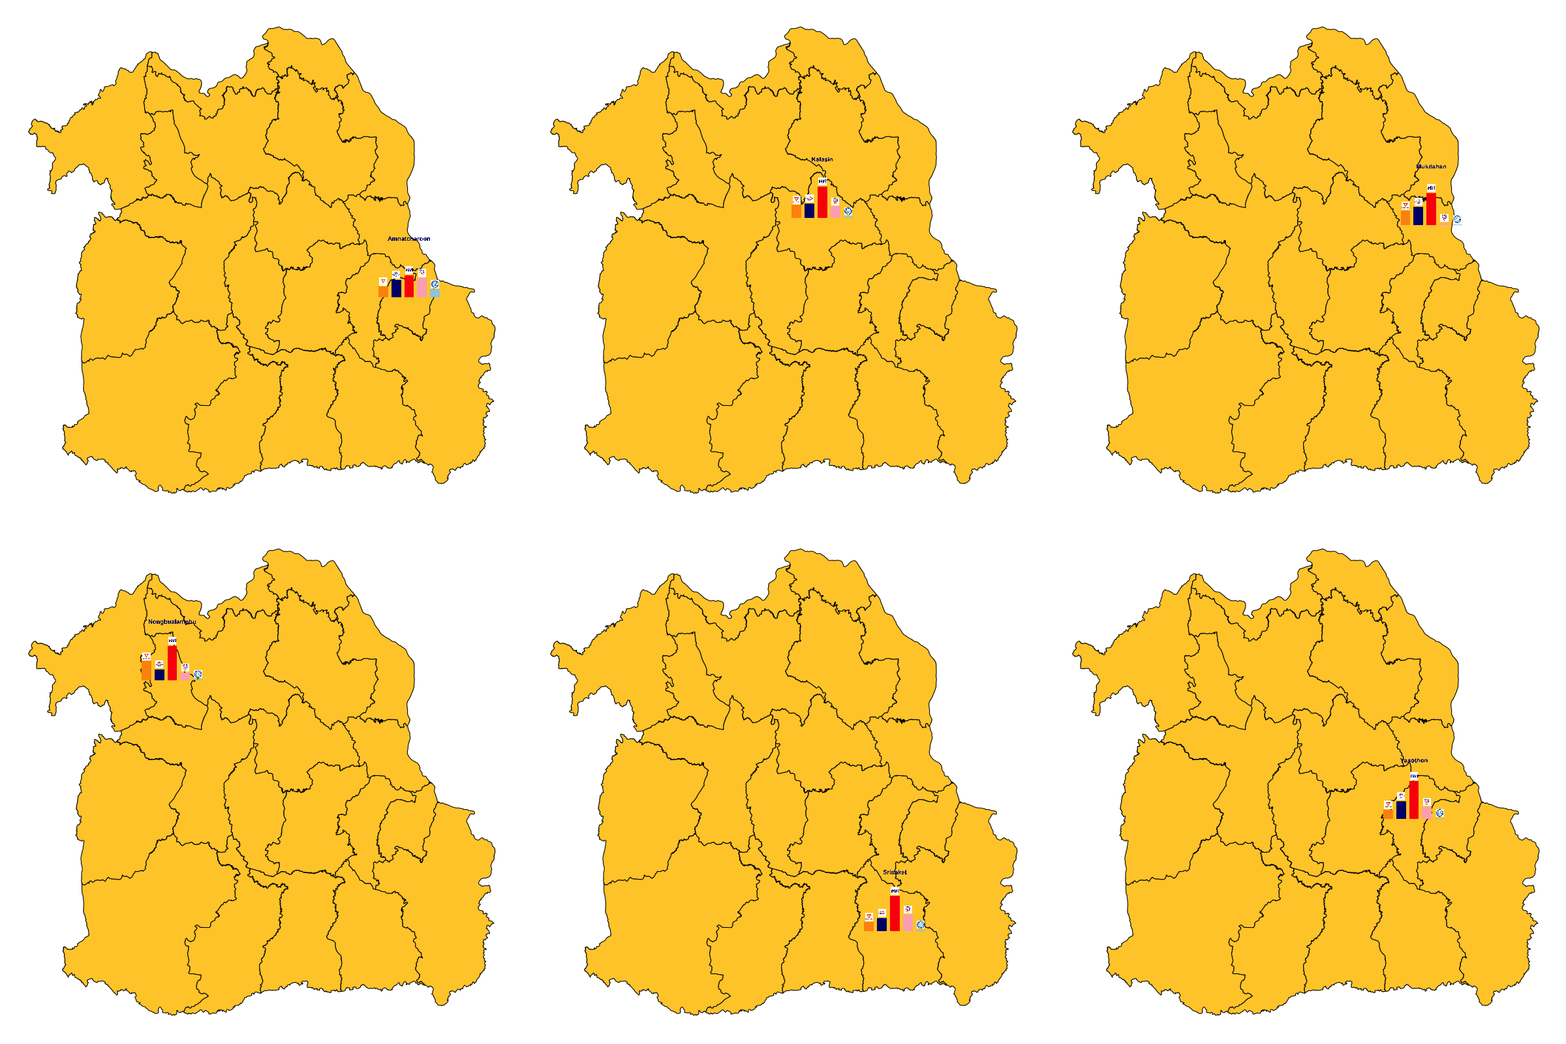
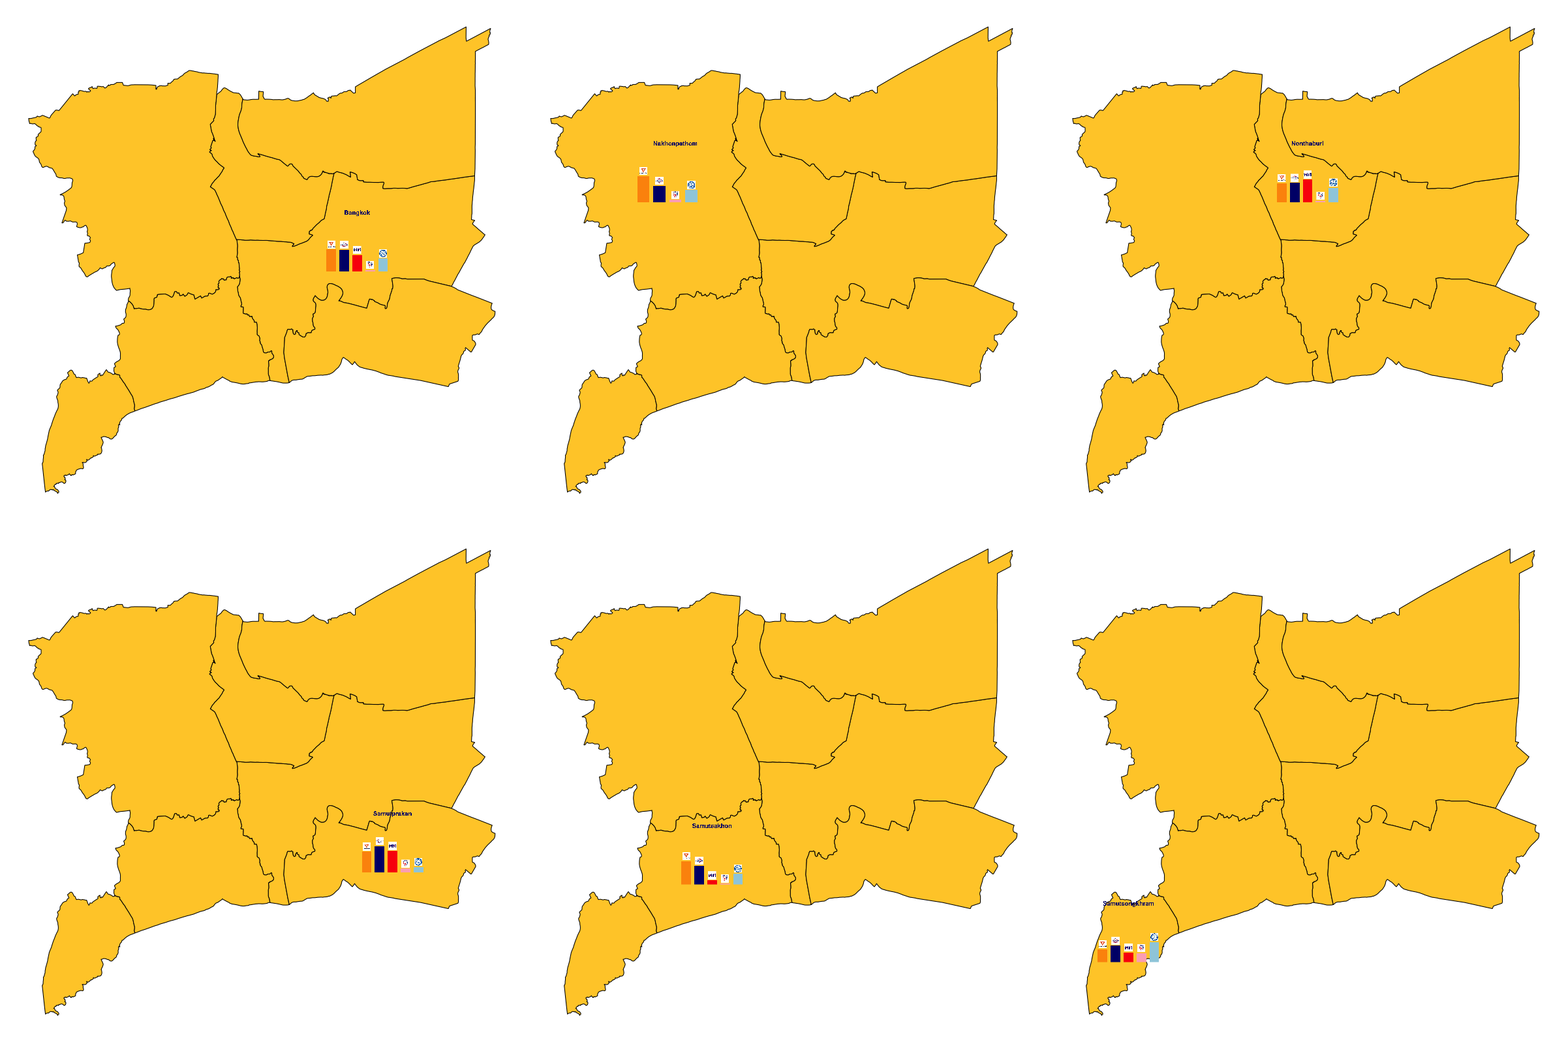
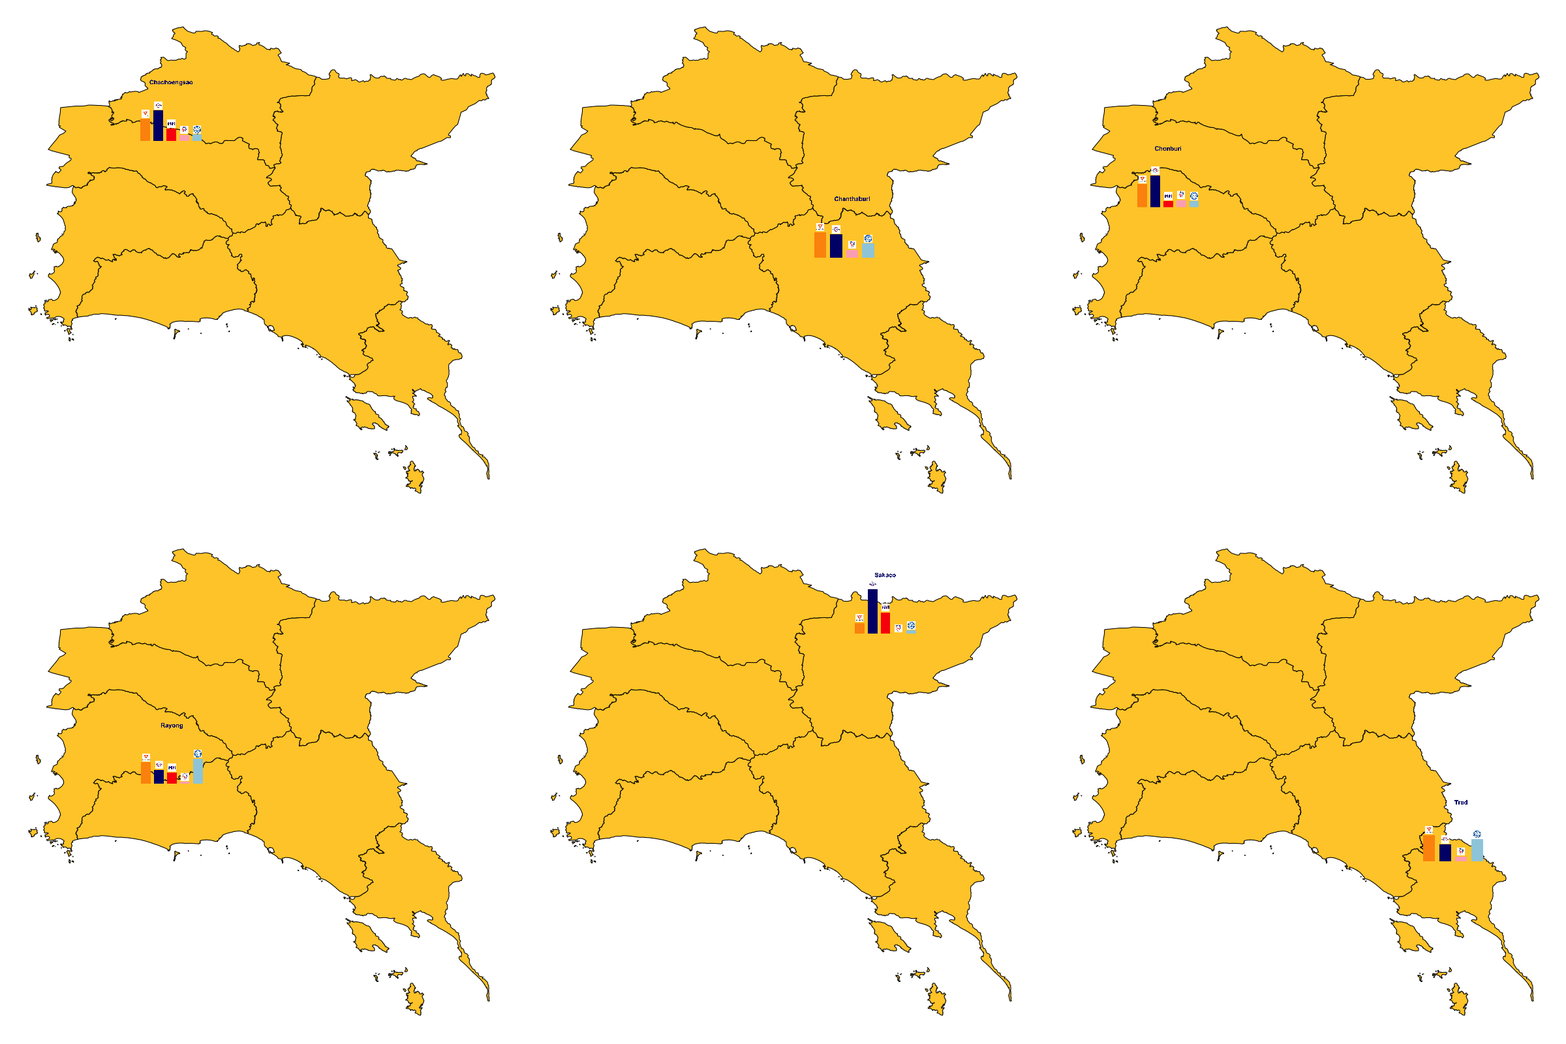
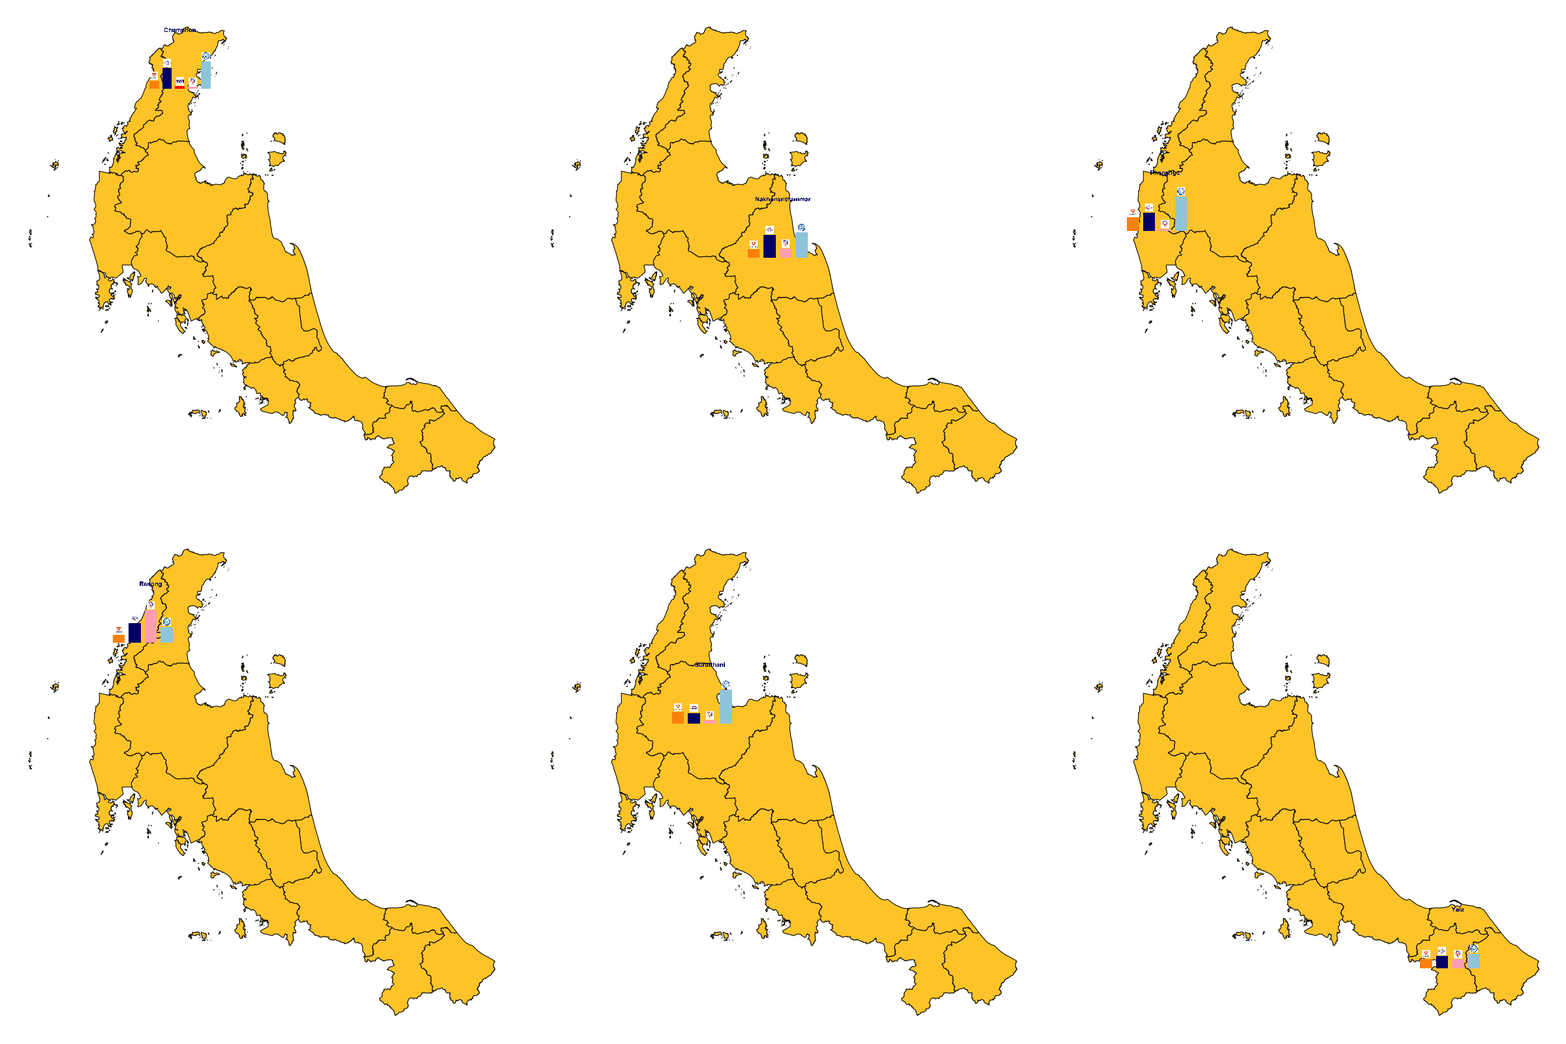
อีกรูปแบบหนึ่งที่น่าจะเป็นประโยชน์ต่อการทำ Data Visualization ก็คือ การแสดงข้อมูลในเชิงพื้นที่ซึ่งช่วยให้เราสามารถวิเคราะห์บริบทที่แตกต่างกันของแต่ละพื้นที่ เพื่อให้การแสดงข้อมูลมีความน่าสนใจมากยิ่งขึ้น
Fig.2 แสดง (Static) Data Visualization โดย Link ข้อมูลผลการเลือกตั้งเข้ากับ Polygon ของจังหวัด และเพื่อเพิ่มความน่าสนใจ จึงลองสร้าง Animation ที่แสดงผลการเลือกตั้งในระดับจังหวัดเช่นเดียวกัน ดังแสดงใน Fig.3
โดยในส่วนของข้อมูล Shapefile ของจังหวัดทั้งหมดของประเทศไทยนั้น ผมทำการ Download จาก ArcGIS REST Services Directory ของ GISTDA และแปลงเป็น SpatialPolygonDataFrame
หมายเหตุ: เพื่อประหยัดพื้นที่ในบทความ ผู้เขียนขอข้ามขั้นตอนการเตรียมข้อมูลอย่างละเอียด
Guiding R-Script สำหรับการทำ Data Visualization และ Data Animation ข้อมูลผลการเลือกตั้งเชิงพื้นที่ มีดังต่อไปนี้
# Create function to plot each region separately
region <- c("north","west","east","neast","central","south","metro")
plot_by_region <- function(region,width,height,offset) {
  zone = region
  ggplot() +
    geom_polygon(data = subset(prv_spX, region == zone), #'prv_spX' dataframe is created from the shapefile downloaded from GISTDA Portal
                 aes(x = long, y = lat, group = group), fill = '#FFCC33', colour = 'black') +
    geom_image(data = subset(center, region == zone), #'center' dataframe contains the centroids of all provinces derived from the shapefile
               aes(image = image, x = lon, y = lat + offset), size = 0.115, by = "width") +
    theme(legend.position = "none"
          , rect = element_rect(fill = "transparent") # all rectangles
          , text = element_blank()
          , line = element_blank()
          , panel.background = element_rect(fill = "transparent", color = NA) # bg of the panel
          , plot.background = element_rect(fill = "transparent", color = NA) # bg of the plot
          , panel.grid.major = element_blank() # get rid of major grid
          , panel.grid.minor = element_blank() # get rid of minor grid
          , legend.background = element_rect(fill = "transparent") # get rid of legend bg
          , legend.box.background = element_rect(fill = "transparent") # get rid of legend panel bg
    )
  ggsave(paste0("/Path/to/Your/Directory/filename_",zone,".png"),
         device = "png", width = width, height = height, units = "mm", bg="transparent")
}

for (i in c(1:length(region))) {
    if (i != 7){
      plot_by_region(region = region[[i]], width = 800, height = 800, offset = 0.2) #All regions except metropolitan
    } else {
        plot_by_region(region = region[[i]], width = 800, height = 800, offset = 0.025) #Metropolitan region only
    }
}

# Create function to animate each region separately
ani_byRegion <- function(region, offset, fps) {
  zone = region
  p2 <- ggplot(data = subset(center, region == zone)) +
  geom_polygon(data = subset(main_spX, region == zone),
               aes(x = long, y = lat, group = group), fill = '#FFCC33', colour = 'black') +
  geom_image(data = subset(center, region == zone),
             aes(image = image, x = lon, y = lat+offset), size = 0.15, by = "width") +
  transition_states(states = prvEN) +
  view_follow() +
  theme(legend.position = "none"
        , rect = element_rect(fill = "transparent") # all rectangles
        , text = element_blank()
        , axis.title.x = element_blank()
        , axis.text.x = element_blank()
        , axis.ticks.x = element_blank()
        , axis.title.y = element_blank()
        , axis.text.y=element_blank()
        , axis.ticks.y=element_blank()
        , line = element_blank()
        , panel.background = element_rect(fill = "transparent", color = NA) # bg of the panel
        , plot.background = element_rect(fill = "transparent", color = NA) # bg of the plot
        , panel.grid.major = element_blank() # get rid of major grid
        , panel.grid.minor = element_blank() # get rid of minor grid
        , legend.background = element_rect(fill = "transparent") # get rid of legend bg
        , legend.box.background = element_rect(fill = "transparent") # get rid of legend panel bg
  )
  p2.1 <- animate(p2, fps = fps, height = 800, width = 800)
  anim_save(paste0("/Path/to/Your/Directory/filename_",zone,".gif"), p2.1)
}
Fig.2 Static Visualization of Mapped Election Results by Region
ไล่จากซ้ายไปขวา
(a) ภาคเหนือ (b) ภาคกลาง (c) ภาคตะวันออกเฉียงเหนือ
(d) ภาคตะวันตก (e) กรุงเทพฯและปริมณฑล (f) ภาคตะวันออก
(g) ภาคใต้
Fig.3 Animation of Mapped Election Results by Region
ไล่จากซ้ายไปขวา
(a) ภาคเหนือ (b) ภาคกลาง (c) ภาคตะวันออกเฉียงเหนือ
(d) ภาคตะวันตก (e) กรุงเทพฯและปริมณฑล (f) ภาคตะวันออก
(g) ภาคใต้
ในส่วนของ Data visualization ของข้อมูลสัดส่วนจำนวนประชากรคนรุ่นใหม่ต่อประชากรผู้มีสิทธิ์ท้ังหมดในแต่ละจังหวัดประจำปี 2561 นั้น ผมตัดสินใจสร้าง Facet plot เช่นเดียวกันกับผลการเลือกตั้งข้างบน เพื่อสะดวกต่อการเปรียบเทียบ ดังแสดงใน Fig.4
Guiding R-Script สำหรับการทำ Data Visualization ข้อมูลสัดส่วนจำนวนประชากรคนรุ่นใหม่ มีดังต่อไปนี้
jpeg(paste0('/Volumes/SGunK/Research_Database/election2019/age_distribution_provinces.jpg'), width = 16000, height = 9000, units = 'px', res = 1000)
ggplot(data = melt_tot, mapping = aes(x = age, y = persons, fill = prvEN)) +
  geom_bar(stat = "identity", position=position_dodge(), width = 0.3) +
  facet_wrap(~ prvEN, ncol = 11) +
  theme(legend.position = "none") +
  ylab("Density (% of population of that age)")
dev.off()
Fig.4 Facet Plot of Age Distribution across Thailand
ในส่วนสุดท้ายของบทความนี้ เราจะมาลองทำ Interactive Dashboard เพื่อช่วยในการวิเคราะห์ผลการเลือกต้ังในเบื้องต้น โดยใช้ Plotly package
Guiding R-Script สำหรับการทำ Interactive Dashboard เพื่อการวิเคราะห์ผลการเลือกต้ังในเบื้องต้น มีดังต่อไปนี้
# Create function to aggregate the number of 'newgen' defined by user
age_range <- function(dummy,new,mid) {
  df <- dummy
  df$newgen <- rowSums(df[,1:which(colnames(df) == paste0("pct_tot_",new))])
  df$midgen <- rowSums(df[ ,which(colnames(df) == paste0("pct_tot_",new+1)) : which(colnames(df) == paste0("pct_tot_",mid))])
  df$oldgen <- rowSums(df[ ,which(colnames(df) == paste0("pct_tot_",mid+1)) : which(colnames(df) == "pct_tot_101")])
  gen_tot <- melt(data = df[,c("prvEN","newgen","midgen","oldgen")], id.vars = "prvEN", variable.name = "age", value.name = "persons")
  gen_tot$persons <- gen_tot$persons * 100
  colnames(gen_tot)[ncol(gen_tot)] <- "density"
  result <- merge(big5, gen_tot[which(gen_tot$age == "newgen"),c("prvEN","density","age")], by.x = "prvEN", by.y = "prvEN")
  result$newgen <- new
  return(result)
}
# Create possible range of 'newgen' definitions
gentotal <- data.frame()
for (i in c(30:45)) {
  gentot <- age_range(dummy = final_tot, new = i, mid = 60)
  gentotal <- rbind(gentotal,gentot)
}
# Create plotly interactive
gx <- highlight_key(gentotal) #key = ~party_crect)
popxelect <- ggplot(data = gx, mapping = aes(x = density, y = vote_pct, group = interaction(party_crect,newgen))) +
  scale_color_manual("พรรคการเมือง",values = c("อนาคตใหม่" = "orange", "พลังประชารัฐ" = "darkblue", "เพื่อไทย" = "red", "ภูมิใจไทย" = "pink", "ประชาธิปัตย์" = "lightblue")) +
  geom_smooth(aes(color = party_crect), method = "lm", formula = y ~ x, se = FALSE) +
  geom_ribbon(stat='smooth', method = "lm", formula = y ~ x, se=TRUE, alpha=0.1, aes(color = NULL)) +
  scale_x_continuous("สัดส่วนผู้มีสิทธิ์รุ่นใหม่ (NewGen) ต่อผู้มีสิทธิ์ทั้งหมดในจังหวัด (%)") + #Density of NewGen (NewGen Voters / Total Voters)
  scale_y_continuous("สัดส่วนคะแนนเสียงที่ได้รับ (%)") #% of votes received
#popxelect
filter <- bscols(
  widths = c(12, 12),
  filter_select("id","เลือกพรรคที่ต้องการวิเคราะห์", gx, ~party_crect),
  filter_checkbox("gen", "เลือกลิมิตของอายุสำหรับนิยามคำว่า 'NewGen' (18 ปี - xx ปี) ", gx, ~newgen, inline = TRUE)
)
bscols(widths = c(4,8),
       filter,
       ggplotly(popxelect, dynamicTicks = TRUE))





Comments